Showing posts with label Cooking. Show all posts

Saturday, 16 February 2013

Garlic fingers - More uses for pizza dough


IMG_3775 (2)

So as a follow up to Fridays posts, when we make garlic bread we will pull out a lump of pizza dough.  Its a quick and easy, not to mention tasty way to make garlic bread.  If you are using a ball of dough from the freezer and let it thaw first.


IMG_3771 (2)

Once you dough is thawed, you need to prep the pan just like you where making a pizza.  A little bit of olive oil evenly brushed over the pan, and a light coating of corn meal over that.


IMG_3773 (2)

Again just like pizza roll it out, you’ll what it more on the thicker side. we don’t worry about the shape so much when rolling it out. When its more or less flat spread some garlic butter on there, we use a store bought one but you could always make your own. 


IMG_3774 (2)

Then all you need to do is add the cheese, and throw it into the oven for 10 minuets or so, all melty cheese and golden brown


IMG_3783 (2)

When you take it out of the oven let it cool for a few minutes, then cut it up.  I use my pizza cutter (I don’t burn my fingers as much that way). Ta-da, Garlic bread figures, the little people really enjoy these more then using French or Italian bread and there’s never any left.

Friday, 15 February 2013

Pizza Night

Since I got my early Christmas present (kitchen Aid Artisan[aka. Ferrari, it’s bright red]) I’ve started making pizza dough again.  It really is quick and very easy, I’ve almost all ways have the fixings for pizza handy too!  I found a recipe I liked and tweaked it a bit, of course. This dough freezes really well and is easy to roll out. So lets get started…
IMG_3754

So here is Ferrari in her staring roll … I put one package of yeast (or 2 1/4 tsp if you have a jar like me)  and 1 tbsp of sugar into the bowl of my mixer, then add 2 1/2 cups warm water.  I turn my mixer on to stir for a few seconds to give it a quick mix.  Let this sit for 10 minutes or until its frothy.  (it frothy in my picture but it is hard to see) 


IMG_3753 (2)
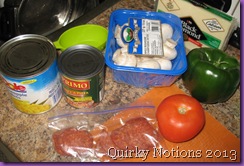
while the yeast is doing it’s thing we can get the toppings ready to go, this is usually a pretty quick thing depending on what's kicking around in the fridge and cupboards.  Tonight's fare is fresh mushrooms, green pepper and some tomato from the fridge, and some pineapple tidbits from the cupboard, and of course Sauce and cheese from there respective hiding places. I try and keep some pepperonis in the freezer in single use portions, how ever saying that we recently had an issue with some I had bought that where not the usual brand and they actually went bad in the freezer.


IMG_3755 (2)
So this next ingredient is a bit of a weird one … a few months ago I started to substitute All Bran cereal for bread crumbs in my cooking (e.g. meatloaf, hamburgers ect…) its a good way to hide some fiber in stuff with out the troops noticing (it has a bit of a sweet flavour to it) … hahaha and my evil plan worked … I’ve made home made shake’n’bake and they all went back for seconds :D
Any who.. one of the recipes I was using called for 1/2 cup of whole wheat flour, not some thing that I keep on hand because I don’t like it :P so I add about 1/2 cup of Crushed All bran in stead, 2 tbsp olive oil, 1 tbsp salt and the first cup or two of the flour.


IMG_3756 (2)


Notice we’re using the dough hook and you’ll want to keep the speed low until the flour is mixed in enough that you won’t get a face full.  So this is what it looks like so far, it will take about 5 cups of flour or so.  You’ll want to add a cup of flour at a time keeping the speed slow enough that the flour stays in the bowl.


IMG_3757 (2)

Here we have a couple more cups of flour, and that the dough is looking more .. well.. like dough.  Keep adding flour until it’s smooth and not sticky.  


IMG_3760 (2)

Ta-da ..Pizza dough! this is what it should look like when you take it out of the mixing bowl, smooth and relatively round.  Now grease a normal mixing bowl with a little olive oil or Pam works too.  Roll the dough around in the oil to coat it and help prevent it from ticking to the bowl.  Throw a clean tea towel over it and leave it in a warm place.  Inn my house I find its to cold to get it to rise so I put it in a gently warmed (not on) oven or over the vent on the oven when I have other things cooking. It well take a bout an hour for it to double in size.


IMG_3761 (2)

Here it is in one of my retro pyrex bowls, nice and poufy. so now I pop it out of the bowl and give it a quick knead, and roll it into a bit of a sausage so I can cut it into 3.


IMG_3762 (2)  
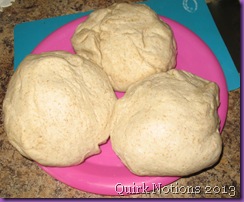
And here you have it 3 lumps of dough!  If you are going to use them right away they need to ‘rest’ for 10 minuets (thy rise a little more), if you want to freeze them now's the time They just fit in the sandwich size baggies before they rest. Pop them in the freezer and when your ready for pizza pull it out and let thaw.  When it’s thawed continue with the instructions below.


IMG_3777 (2)
So first things first, you have to prep the pan you’re using.  What I do is line one of my cookie sheets with some parchment paper because my pans have seen better days, next I pour a little olive oil into the middle of the paper and use a sauce brush to coat the whole thing with a them layer of oil.  When the oil is evenly spread use a table spoon or so of corn meal (that's the yellow stuff you find on the bottom of fresh bread).  Okay now for the hard part … place one of the balls of dough in the middle of the pan and get out the rolling pin,  I usually just make rectangle pizzas but it was valentines day so I made this one in a heart shape …sort of. If you like thin crust roll it so it nice an thin or roll the edges up to make a more store bought look, we just roll it out to fit the pan and no crust.


IMG_3778 (2)

Now we throw our toppings at it, some times the kids really do throw the toppings on. While we get the toppings on I’ll preheat the oven to 350 F.  It only takes 10-15 minuets to cook a fresh pizza depending on how well done you like your crusts.


IMG_3785 (2)

This one is just a normal one we do,  I like my crust pretty light so there nice and quick to cook up.

Thursday, 14 June 2012

Homemade Lactose Free Butter


Well this week I stumbled upon a book at the library on country cooking, and thought I would give butter making a whirl (lol no pun intended). Turns out it supper easy and pretty quick too.IMG_3310

What you need/ I used:

Food processer

Heavy Cream (AKA Whipping Cream in Canada)

water

bowl

Cheese cloth 


IMG_3309


So I was absolutely gitty in the store when I discovered that they now have lactose free Cream, hence the lactose free butter.  So you start by setting up you food processer with your chopping blade.  Pour your cream into the food processor and start, my food processor only has a high and a low setting, so I used High.


 IMG_3405

After a few minutes you’ll notice it’s turned in to whipped cream (haha duh right  :) ), You want to keep whipping it. 


IMG_3313


You want the buttermilk to separate from the fat, this only takes 5 – 10 minutes.  The fat turns itself into a ball and the milk will sit on the bottom.


IMG_3314

 IMG_3407

Next you want to turn it out into your cheese cloth, I think I had about 4 layers or so sitting in my canning funnel so that the buttermilk can drain into the bowl underneath.  Now pick it up and give it a twist, you want to do this over your bowl.  You want to get as much of the buttermilk out as possible.


 IMG_3411

When you have got as much of the butter milk out as you can out need to rinse it, for this I took my butter still wrapped in the cheeses cloth and swished it a round in a bowl of water, give it a wring, I did this a few times.


The next step is to put into a mold of some sort, I have a collection of little silicone molds from the dollar store in varying shapes and sizes.  I line my mold with plastic wrap, for easy clean up, and storage.  So now push the butter into our mold, and place in the fridge to harden before you try and take it out of the mold.


IMG_3321 IMG_3409 IMG_3410

    And the finished product, after about an hour in the fridge it hard enough to take out of the molds, I then wrap it in the plastic wrap that I lined the mold with and pop it back in the fridge or into the freezer.

IMG_3324IMG_3325

Tuesday, 22 May 2012

Home Made Pasta Sauce


IMG_3241So this is the first time I’ve made pasta sauce, but with 20 pounds of tomatoes in my freezer from last fall its time they got sauced.  As mentioned before I’m not one for instructions…. so I got out 2 bags of frozen tomatoes (theses are the large ones each bag holds about 4 lbs).  Now I removed the skins from my tomatoes, which is really easy seeing that they are frozen, all you have to do is let them sit in warm water for about a minute cut your top off and the tomato will pop right out.  I had to let my tomatoes thaw a bit, my pour food processer couldn’t keep up with them frozen solid.  So when they were a little less frozen I sent them for a whirl, I made it pretty smooth the kids don’t like there food chunky. I also snuck in 2 cups of zucchini, some onion, a couple cloves of garlic, and a couple good sized carrots.  What they don’t know wont IMG_3237hurt them :)  Now into the pot it goes! add what ever spices you like to taste, I added thyme, oregano, rosemary, basil, pepper, and a little bit of red pepper flakes for a little kick, I also added a little brown sugar to sweeten it up a bit.  I let it simmer on medium/low for almost 2 hours, this is how long it took for all the naturally occurring water in the tomatoes to evaporate off.  Don't forget to stir often you really don’t want to burn it.  I left my sauce quite acidic just for the sake that I am canning it, when I go to use it I will add more sugar.  So when I was happy with it I packed it in my clean hot jars, leaving 1/2 an inch head space,(don’t forget to remove the air bubbles and clean the tops of the jars) put the lids on and returned the jars to the boiling water in my canning pot.  They need to boil for 35 – 40 minutes. For this batch I managed to fill 5 - 500mL  jars.  Well the jars IMG_3230are bubbling away do up you labels, don’t forget to add the date it was made, or it may turn into one of the mystery jars in the back of the cupboard. 
Now when it comes to canning there are a few rules you must follow from the recipe the amount of acid and the length of time to process in the water bath. (For the amount of tomatoes I used I added a 1/4 cup of lemon juice) If you’re new to canning I would would recommend following a recipe / canning instructions.  There are tons of good books out there, and you can borrow most of them from the library for free :) I own the  Blue Ribbon Preserves by Linda Amendt. And Google, I love Google
  
 IMG_3238
IMG_3240

Friday, 18 May 2012

The Honey-do List


Picture from phone 184
Today I decided to post something a little different. I’m taking a little break from sewing this week to work on the household honey-do list.  I have  bunch of little projects to do around my house that have been sitting around for a long time (years in some cases).  There is a cupboard to go up in the bathroom, and I would like to paint my towel rack that the previous finish is coming off of.  And this is garden weekend here, I have my potatoes to go in the garden, and we are going to plant the pumpkin patch and get some of the other vegg in. 
And there is the pool (I use the term loosely 10 ft round & 2ft deep) to be cleaned (yuck), set up and ready to go …  with the temps getting up there its time to  get R done.
So I’ve spent most of my week in preparation for getting some stuff done around the house, like getting gas for the lawn mower, getting the garden supplies, and all the hardware and paint for some of the bigger projects.
Picture from phone 143 I will post some before and after pictures of some of the projects  as I go.
I’ve done some little things like knitting up some washcloths, lot of baking before it gets to warm this week, but nothing to exciting.