Showing posts with label DIY. Show all posts

Monday, 21 January 2013

Little mans boxer briefs


 IMG_3730   My little man asked for some more boxers the other day, so i asked if he would like me to make him some boxer briefs.  So he ran to find a donor pair from his drawer that where getting a little small.  so we set to work  carefully cutting them apart along the seam lines.  So I found the easiest way to trace around the fabric “pattern pieces” is to put down a piece of cardboard, large enough to for your largest pattern pieces.  On top of the cardboard I put down a piece of paper (i use Kraft paper, used for wrapping packages and come in a roll like wrapping paper) and carefully pin the pieces out flat and trace around them with a pencil.  Now I use my snazzy rulers and make clean lines, because we want them a little bigger I add an extra 1/4 inch or so around all the edges.


IMG_3731


For the front of the crotch I made the lies less curvy and we opted not to add the “pee pocket” (the hole between the layers in the front … you know what it’s for … we just call it the pee pocket) So it’s just a single layer of fabric, which simplifies things a bit. For this project we are upcycle some old t-shirt we have kicking around that are in good shape. 


IMG_3721


So with our new paper pattern we cut out 2 leg pieces,  1 bum, and 1 crotch piece.  Now because of the nature of the area, you want to keep the seems as flat as possible, so instead of the standard seam I placed them one on top of the other an used a surger type stitch or any other fancy or plane stitch.  First  I stitched the crotch to the bum, and each of the leg seams. 


IMG_3722


Next I put the legs onto the center pieces, again using the serger stitch on my machine making a flat seam.


IMG_3724


Here’s what they look like with both legs attached


IMG_3726


Next they needed a waistband, for this pair we use a pieces of non-roll elastic.  I stitched the ends together to make a loop and then pinned it to the top of the undies, making sure to stretch it out as you feed it through the machine.  I used an elastic stitch that is on my machine but a plain zig zag work just as well.


 IMG_3727 

IMG_3720

So here’s the two pairs I’ve made so far.  the only thing left is to finish the leg openings.  The red pair has just a plain piece of 1 inch elastic.

IMG_3728


For fun I use some of the finished edges from the bottom of one of the t-shirts, again trying to keep the seams flat. don’t forget to stitch the ends together


IMG_3729


And voila little boxer briefs!


Sunday, 20 January 2013

Little Suitcase


I found this little suitcase picture on Pintrest there was no instruction an where I could find so I sort of made it up as I went along.

255579347574744829_1iEr9i22_c

So here is a piece of the picture I found. The original is quite long but you get the idea.


IMG_3693

Materials used; I used a pillowcase, a old scrub shirt, a pair of old jeans, and a two longish coat zippers I had kicking around.  For my trial run I decided not to use any interfacing or batting between the layers, to save my poor sewing machine some work (denim is quite thick and I find that the standard home sewing machines do not like to many layers of it at one time,   find three is about the max before I start to have problems).
 

IMG_3695

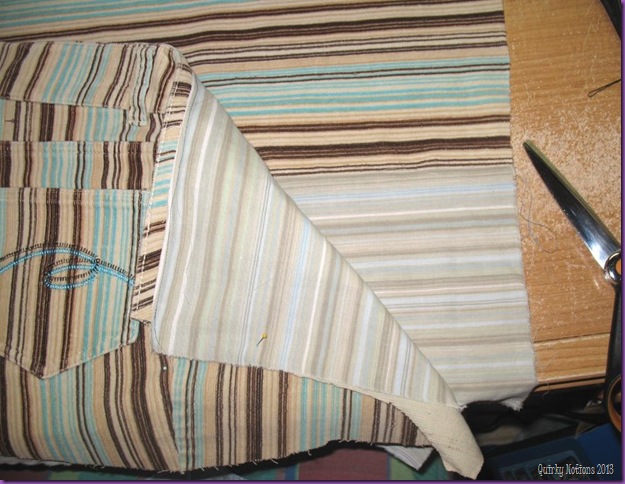
So First things first, because I’m using finished garments/linins I have to cut open the finished seams so I can lay the pieces flat.  For this bag I’ve cut down the front seam from the zipper and all the way around that seam to the back, so that the piece I’m left with is one of the back pockets and one off the front pockets (can be seen better in the next picture).  To reduce a little bulk at the waistband of the pants I cut it open leaving enough fabric to attach a lining fabric to (aka the pillowcase). For the back piece of the bag front (the pocket piece forms a large front pocket on the bag front) I cut a piece of the pant leg the same length as the pocket piece, and again to reduce some of the bulk used the pillowcase to line the unseen part at the bottom( this will ultimately be the inside of the large front pocket).


IMG_3696

Next I pinned the pocket front to the back piece,  trimmed the edges, added the piece for the inside lining (I used the scrub shirt for this) and basted all the pieces  together.  I also cut the back bag and back lining pieces and basted them together. 

This is also a good time to make sure any pockets you want on the inside are sewn in before you baste the pieces together.  And what kind of of handles or  strap you want to attach.  I used so 1 1/2 inch wide twill tape from my stash. 


 IMG_3698

Using the the pant legs for the zipper band I made one long rectangle (long enough to fit around the bag) and the matching lining piece.  With both fabric and lining  cut the band to accommodate the zippers.

IMG_3699

Because I used two coat zippers I put the tops together at the center top and stitched them in.
 

IMG_3700

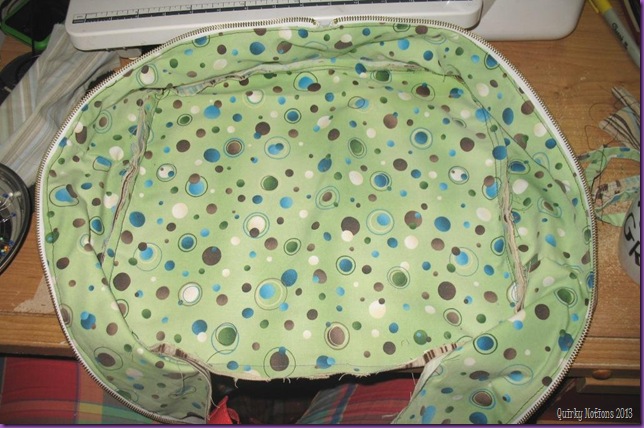
Next I joined the zipper band to the bag front and back starting from the center top and working my way down each side. this is the time you would add piping to the out side of the bag if you like, you also could sew you seems to the out side and bind them the same way I did it look pretty good too, I did my seem to the inside and no piping.  I made my Bias tape out of some of the pillowcase so it would match, but you could use store bought if you like.  Notice I've left most of the bottom open and free, I'll show you why in a later step.


IMG_3703

So here you can see the pockets on the inside front and the stitching for my handles, I’ve also started to pin my bias tape around the seems for a nice clean finish inside the bag.  This time I started from the bag bottom and worked my way all around the seem of the bag.  do the same to both sides. 


IMG_3705

Next I attached the bag bottom to cover the zipper ends from the out side, for this I used a small rectangle of fabric from one one the pant legs. I’m surer there a better way to do this but all in al this worked ok.  I sewed this piece on by machine, just remember not to  sew over the zipper with your machine if you’ve used a large metal zipper like I have.


IMG_3707

For the inside bottom I used a piece of the pillowcase to match the bias tape, this piece I stitched in by hand
IMG_3708

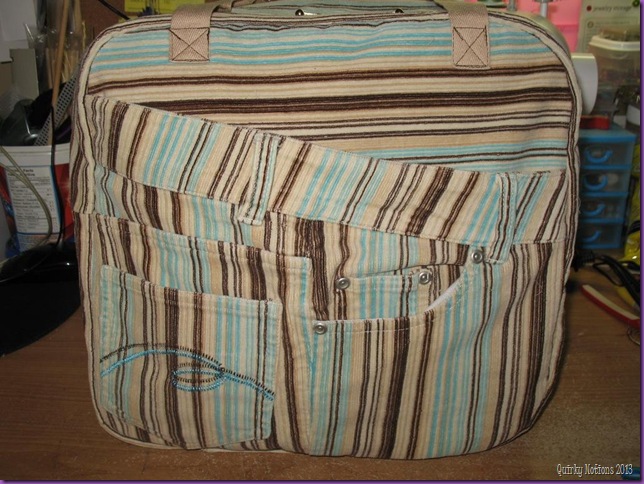
And here she is the finished bag, I think it’s super cute!

A little knights tabard

   
Well this past Halloween my little man wanted to be a knight, well lets face it not every one has a suit of armor kicking around in there closet, so we got creative.  We went on a Google search for some non-armor ideas and came up with making a tabard.  Now for those of you  not up on medieval fashion, it is the colours they would where over there suites of armor .  So here’s three of our inspiration pictures we used

12878098158262knightssir-lancelot-costume-by-monty-python

IMG_3679
IMG_3674
We had a sword and shield all ready so we decided to use the pattern off his shield for the tabard crest.  I sorta traced the pattern out on a piece of paper and for fun coloured it in with the colours he wanted to use.  And did A quick sketch of the pieces with the measurements and ideas for trim jotted down .


IMG_3682

Step number one was to cut all our pieces out and add the trim to the bottom pieces, and sewed to shoulder pieces together and finished round the neck hole.  (remember that your head needs to fit through it.) and finished the side openings.
Next I added the crest to the front of the tabard. I cut it out of felt so it would not fray and gave the pieces a quick top stitch around the edges.
the next step was to attach the top to the skirt, I left the whole side of the top open so that there was enough room to get a jacket under it. The skirt is attached at the waist line.IMG_3681


Picture from phone 1303


Here is the picture of the finished Tabard, we used a waffle knit long sleeved under shirt underneath as his “chainmail”.  I made him a knit “helmet”, pictured below. when it was all put together it look good and he loved it and still wears it around the house. 


Picture from phone 1207Picture from phone 1298

Thursday, 14 June 2012

Homemade Lactose Free Butter


Well this week I stumbled upon a book at the library on country cooking, and thought I would give butter making a whirl (lol no pun intended). Turns out it supper easy and pretty quick too.IMG_3310

What you need/ I used:

Food processer

Heavy Cream (AKA Whipping Cream in Canada)

water

bowl

Cheese cloth 


IMG_3309


So I was absolutely gitty in the store when I discovered that they now have lactose free Cream, hence the lactose free butter.  So you start by setting up you food processer with your chopping blade.  Pour your cream into the food processor and start, my food processor only has a high and a low setting, so I used High.


 IMG_3405

After a few minutes you’ll notice it’s turned in to whipped cream (haha duh right  :) ), You want to keep whipping it. 


IMG_3313


You want the buttermilk to separate from the fat, this only takes 5 – 10 minutes.  The fat turns itself into a ball and the milk will sit on the bottom.


IMG_3314

 IMG_3407

Next you want to turn it out into your cheese cloth, I think I had about 4 layers or so sitting in my canning funnel so that the buttermilk can drain into the bowl underneath.  Now pick it up and give it a twist, you want to do this over your bowl.  You want to get as much of the buttermilk out as possible.


 IMG_3411

When you have got as much of the butter milk out as you can out need to rinse it, for this I took my butter still wrapped in the cheeses cloth and swished it a round in a bowl of water, give it a wring, I did this a few times.


The next step is to put into a mold of some sort, I have a collection of little silicone molds from the dollar store in varying shapes and sizes.  I line my mold with plastic wrap, for easy clean up, and storage.  So now push the butter into our mold, and place in the fridge to harden before you try and take it out of the mold.


IMG_3321 IMG_3409 IMG_3410

    And the finished product, after about an hour in the fridge it hard enough to take out of the molds, I then wrap it in the plastic wrap that I lined the mold with and pop it back in the fridge or into the freezer.

IMG_3324IMG_3325

Wednesday, 30 May 2012

Rag Rugs

Ok so last week will I was joy ridding through Pintrest I came across a post for a rag rug, to witch I've been want to make for a while now.  But I'm not particularly motivated to do the traditional braided rug, just to much effort then I wanted to put forth. so I've been on the look out for alternatives, well I found one over at Sugar Bee Crafts.  Now I warn you, I am not the read the instructions kinda gal, so I didn't exactly read it, just sorta skimmed over the pictures. I have enough crochet skills to make basic stitches and on a good day a circle.


So as I said before we love sheets around here (very useful things), so now I had a mission and needed to recruit some "helpers" (I use this term very loosely), I got to work .... I cleaned out my linen closet.  We found some sheets in there I couldn't even identify as mine ... any ways we pulled out the ones that where see through, had no elastic left, or just weren't being used.


I found lots of helpers for the next part, for some reason you can always find people to "break" stuff.  we got to making our "yarn" we tore 1" - 1 1/2" strips from our sheets, and rolled them in to balls.


Then I had a bit of a problem finding the giant crochet hooks, I did find them a few days latter at our local fabric shop for a couple of bucks.


This method works up really quickly, It took me and my poor crochet skills about an hour to get the middle done (about a foot to foot and half worth of rug).  Sweet I love instant gratification :)
I can easily get one done in a day in my spare time (ha ha spare time :)


 So as it worked out that 3 double/Queen size sheets will get you about a 3 foot round rug, give or take.  I've gotten a few comments on them, my purple and blue one I had made for myself as already been stolen by my son for his room. and the yellow and blue one matches my new curtains, you can see them here and here.


DIY Explorers Play Tent


IMG_3320  IMG_3266
After seeing the play ten tutorials on on Pintrest I thought I would give one a try for my little man, and it give my hubby some thing to channel his energy into.  So we went out to the hardware store for some supplies.  What we came home with was 2 – 1x2’s that were 8 ft long and a 5/8 inch dowel.  When we got home we raided the linen closet, yet again and pulled out this twin sized sheet set.  It kinda reminds me of the turn of the century explorers (i.e.. Indiana Jones) or an African safari.


IMG_3287
IMG_3270
So now with our materials in hand we headed out for the back yard.  We started  by cutting our 1x2’s in half, so they are roughly 4 ft long, and drilled a hole in one end of each of them.  We used a 5/8 inch drill bit because we wanted to have a sung fit so the dowel didn't fall out of the holes well the kids are playing with it, and we didn’t want to use any glue/hardware because we still wanted to be able to fold it up or take it apart for storage purposes.

Here’s a picture of just the frame, really Simple and supper quick for this part.
IMG_3273

And here is a picture of the the sheet over the frame.  This is where all tutorials I saw online stopped, but we decided to add “doors” (flaps that open and close) to the front and back. We also added a tube at the top to run the dowel through, so it wasn’t sliding all over the place. All you do to make the tube is fold the sheet in half and run a line of stitching down the center along the fold, keeping in mind that the tube your making needs to be big enough to run the dowel through.  On mine I sitched about an inch from the fold.
 IMG_3279

As you can see we used the flat sheet for the main tent portion and I used the fitted sheet for the ends.  We started by removing the elastic from the ends and cutting the seams out of the corners.  Then we folded the sheet in half and cut down the center to make two end panels, then we folded each end panel in half and cut to make the opening for the flaps.  Then we finished the ends that would become the opening of the door (fold over twice and stitch), and hemmed up what would become the bottom of the door panels.  For the the closures on the doors we used  Velcro on one side and on the other we used twill tape for ties.
We also add some ties to the side to help support the weight of the sheet on the frame and so we could tie the doors open.

IMG_3318
The tent has been a big hit, my kids and all the neighbor kids have been play in it nonstop.  If you make one and add the doors like I did make sure your elastic loops are on the out side of the tent, I have to go back and move mine, but other then that it works great! and cost less then $15.