Showing posts with label Sheets. Show all posts

Friday, 27 July 2012

I Finally got to wear it!


IMG_3439

I thought I would do a quick post for my regency bib front dress. The Family and I went to Fort York, in Toronto, back in June for the War of 1812 celebrations.  I took my recently finished dress with me so I could get some pics of me wearing it in a setting of the same time period. Although the pics aren't so great I had a good time at the fort with the kids.


IMG_3438
Me looking not so impress outside the officers mess.  While I was actually wearing my dress I found a few things that need shall we say adjusted... I need to make a tuck in the bodice so the shoulder will stop sliding down.

IMG_3419
some of the volunteers that were roaming around
IMG_3428
the Encampment, they had 200 tents set up that weekend
IMG_3471
The York Regency Dancers, they are based at Fort York. 
They were a  lovely group off people we had dance lesions while we were there.

IMG_3442
And a picture from one of my budding photographers!

Wednesday, 30 May 2012

Rag Rugs

Ok so last week will I was joy ridding through Pintrest I came across a post for a rag rug, to witch I've been want to make for a while now.  But I'm not particularly motivated to do the traditional braided rug, just to much effort then I wanted to put forth. so I've been on the look out for alternatives, well I found one over at Sugar Bee Crafts.  Now I warn you, I am not the read the instructions kinda gal, so I didn't exactly read it, just sorta skimmed over the pictures. I have enough crochet skills to make basic stitches and on a good day a circle.


So as I said before we love sheets around here (very useful things), so now I had a mission and needed to recruit some "helpers" (I use this term very loosely), I got to work .... I cleaned out my linen closet.  We found some sheets in there I couldn't even identify as mine ... any ways we pulled out the ones that where see through, had no elastic left, or just weren't being used.


I found lots of helpers for the next part, for some reason you can always find people to "break" stuff.  we got to making our "yarn" we tore 1" - 1 1/2" strips from our sheets, and rolled them in to balls.


Then I had a bit of a problem finding the giant crochet hooks, I did find them a few days latter at our local fabric shop for a couple of bucks.


This method works up really quickly, It took me and my poor crochet skills about an hour to get the middle done (about a foot to foot and half worth of rug).  Sweet I love instant gratification :)
I can easily get one done in a day in my spare time (ha ha spare time :)


 So as it worked out that 3 double/Queen size sheets will get you about a 3 foot round rug, give or take.  I've gotten a few comments on them, my purple and blue one I had made for myself as already been stolen by my son for his room. and the yellow and blue one matches my new curtains, you can see them here and here.


DIY Explorers Play Tent


IMG_3320  IMG_3266
After seeing the play ten tutorials on on Pintrest I thought I would give one a try for my little man, and it give my hubby some thing to channel his energy into.  So we went out to the hardware store for some supplies.  What we came home with was 2 – 1x2’s that were 8 ft long and a 5/8 inch dowel.  When we got home we raided the linen closet, yet again and pulled out this twin sized sheet set.  It kinda reminds me of the turn of the century explorers (i.e.. Indiana Jones) or an African safari.


IMG_3287
IMG_3270
So now with our materials in hand we headed out for the back yard.  We started  by cutting our 1x2’s in half, so they are roughly 4 ft long, and drilled a hole in one end of each of them.  We used a 5/8 inch drill bit because we wanted to have a sung fit so the dowel didn't fall out of the holes well the kids are playing with it, and we didn’t want to use any glue/hardware because we still wanted to be able to fold it up or take it apart for storage purposes.

Here’s a picture of just the frame, really Simple and supper quick for this part.
IMG_3273

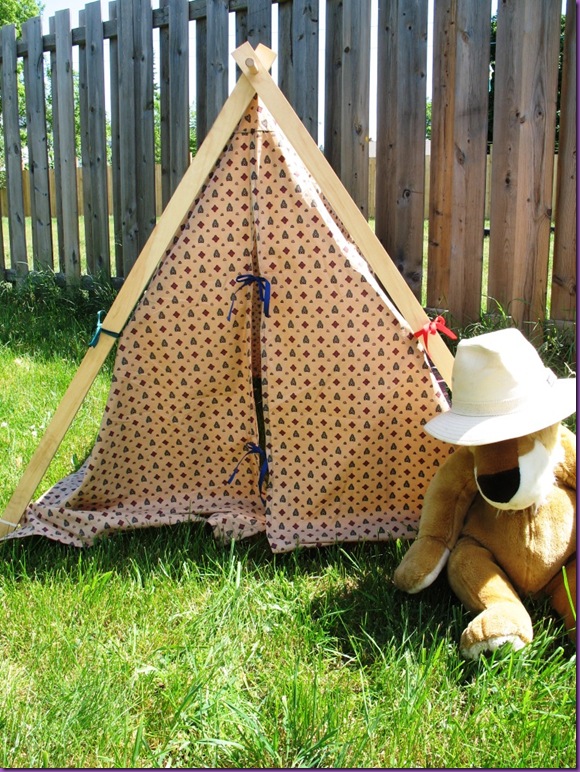
And here is a picture of the the sheet over the frame.  This is where all tutorials I saw online stopped, but we decided to add “doors” (flaps that open and close) to the front and back. We also added a tube at the top to run the dowel through, so it wasn’t sliding all over the place. All you do to make the tube is fold the sheet in half and run a line of stitching down the center along the fold, keeping in mind that the tube your making needs to be big enough to run the dowel through.  On mine I sitched about an inch from the fold.
 IMG_3279

As you can see we used the flat sheet for the main tent portion and I used the fitted sheet for the ends.  We started by removing the elastic from the ends and cutting the seams out of the corners.  Then we folded the sheet in half and cut down the center to make two end panels, then we folded each end panel in half and cut to make the opening for the flaps.  Then we finished the ends that would become the opening of the door (fold over twice and stitch), and hemmed up what would become the bottom of the door panels.  For the the closures on the doors we used  Velcro on one side and on the other we used twill tape for ties.
We also add some ties to the side to help support the weight of the sheet on the frame and so we could tie the doors open.
IMG_3318
The tent has been a big hit, my kids and all the neighbor kids have been play in it nonstop.  If you make one and add the doors like I did make sure your elastic loops are on the out side of the tent, I have to go back and move mine, but other then that it works great! and cost less then $15.

Monday, 28 May 2012

$5 Sundress


IMG_3263
IMG_3224

This was a supper fast and easy sundress to make.  I got a cheep tank top, it was only $4 from the the local department store, and an old bed sheet from the closet. 
The first thing you do is decide where you want your waist line to be, I did mine at more of an empire waist line (I find it more comfy not to have things floating around my natural waist).  So I put on my tank top and marked where I wanted the waist line.  Take it back off and cut along your markings, remember to leave a seam allowance.  The next thing was to cut the sheet to the length you want the skirt and sew the it into a tube.  Run some gathering stitches around the top of the skirt.


IMG_3226

Now pin the skirt to the tank top, and gather your stitches to fit.  On my waist band I also added a 1/4 inch wide elastic for a little extra give.  I’m notorious for tripping over skirts and closing them in doors and stuff.  Run it through the sewing machine, and then turn it right side out. This dress only used about half a queen flat sheet, and I used the finished edge around the bottom so I didn’t have to hem it up.  It cost less then $5 in materials and is really comfy to ware.

Sunday, 6 May 2012

Well Kiss My Grits !

 
 I've made some aprons this past week so I tought I would share.  The frist ones I did, I guess you would call a clothes pin apron.  They have the nice big kagroo pocket in the front.  Made then up from some vintage bed sheets from my linin closet (still don't know where some of them came from).  The nice thing about making my own aprons is that I can make the tie nice and long and wide so they don't cut into your waist, make big pockets, and most important is get enough coverage on the boobage.


My blue one here was also made from some more random bed sheets.  It's reversable, I thought that would be kinda cool and wasn't any more work then if it was one sided.


I started by drafting my self  out a pattern, then laid it out on my "fabric" and cut it out. The pockets are the pieces cut from the neck opening of the apron, so there nice and big.


Then I stitched my pockets on to the fronts.  Bound the whole thing together with some of my home made bias tape.


And voila one reversable apron!


Friday, 4 May 2012

Easy Sundress Tutorial

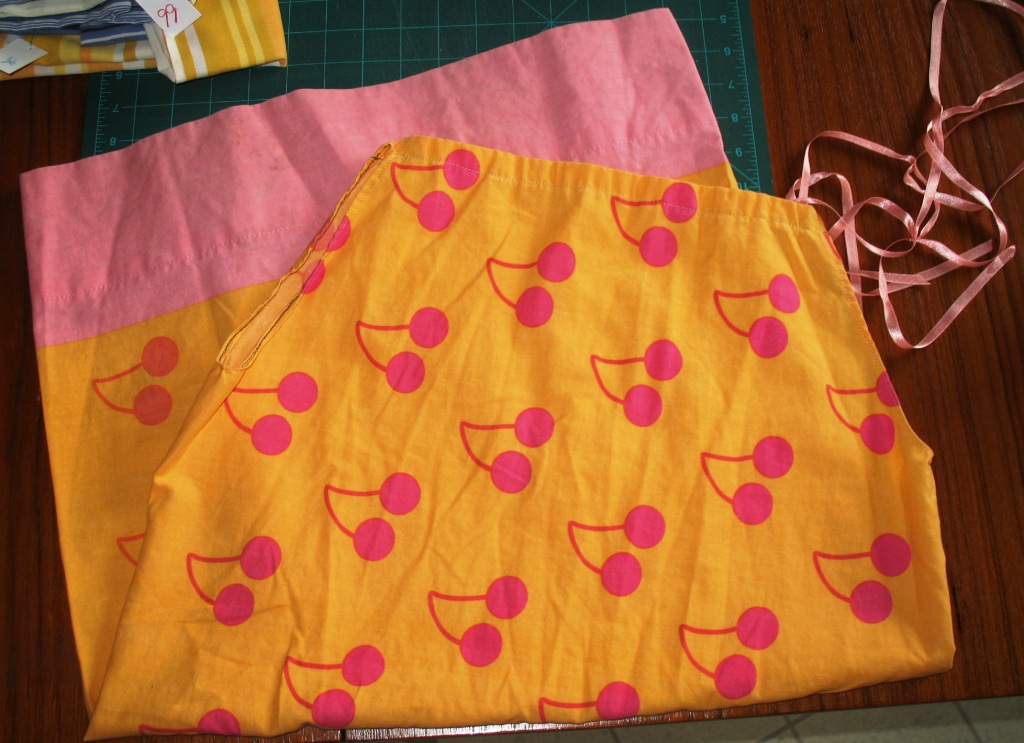
I thought it was time for another easy sewing project, from you guessed it ... more bed sheets, well pillow cases, but they tend to come with the bed sheets. 


So we are going to start by turning the pillow case inside out, and trim the bottom of the case so it resembles a tube.


The next thing we are going to do is fold the tube in half length wise so your sides will match when you cut the arm openings.  supper easy, Ive done it all with straight lines.  I've made the front and back neck line 10" across (5" when folded) and the side openings 8" down. 


 So draw a line connecting the two measurements and cut through all the layers.


On this one I used bias tape to finish the arm holes, on the pink one I just turned under the edge. You really can be as fancy as you want.

The next thing is to make the channel for the shoulder straps.  Again really easy just fold over the edge leaving enough room to feed your strap through, and the ends open. 


 Ribbon, twill tape, or shoe laces, what ever is handy really.  feed through the opening and tie in a pretty bow.


 My Little one loves these dresses, the brighter the better it seams.  The dress comes to about her knees and she is 9 years old.  you could easily make it shorter by trimming more of the bottom off the pillow case.  You could all so add pockets or trim it up with ribbon too.

Wednesday, 2 May 2012

Some lessons learned


So I've been working away on some more rag rugs to sell at the farmers market later this month and I've leaned a few things that make life a little easier. 

Lesson 1, when working in an oval it is much harder to keep it flat.


Lesson 2, it is worth the time to wind your material into balls, things go much smoother and faster. 


Lesson 2, a King size sheet is a lot of fabric.  4, not enough increases and you will have a bowl.  5, to many increases and you'll have a lovely sun hat :). 


Just a quick post to share what I learned.


Tuesday, 1 May 2012

Works in Progress

This is a project currently on my to be done list, it's a pioneer dress for my youngest girl.  Hopefully I'll get it done in time for Halloween, I know it's only May but things have a tendency to get... shall we say pushed to the back burner.  It was supposed to be for my oldest girl but she out grew the pattern 2 years ago (that back burner thing) I  really have no excuse for my not getting it done two years ago.  I have every thing for right down to the thread and zipper all safely tucked away and altogether..


One of the other things Ive been up to on the costuming front is an 1810 ish ridding habit.  It has been my first run at draping on a dummy, and working with no pattern.  I have a toile done of the top half of the jumper and the spencer, and a finial of the chemisette.


Now all I have to do is find some fabric that would suit the ridding habit.

I'm starting to think I would really like to make a bustle dress,  and/or an Edwardian dress (aka Titanic era) I found some great examples of some dresses from the house of Worth I like the red one is a 1910 evening dress and the pink one is another evening dress from about 1900.  And the purple dinner dress from about 1910 as well

Pinned ImagePinned ImagePinned Image


I also really like the look of the walking suits from that era as well.  the Blue is from about 1909, and the black and white pin strip (1910ish) reminds me of the walking suit Rose wears in Titanic, for good measure I put up a picture of Rose's boarding dress from the movie (1912).  I still love this dress I like the more fitted style coming out around 1912

Pinned ImagePinned ImagePinned Image


And then there's the bustle dresses, a marvel of construction ... so far my favourites are the burgundy one dated at about 1883, not to big a bustle on this one.  The Purple one has a definite bustle (1883) as well as the red one (1800)

Pinned ImagePinned ImagePinned Image


Ah well I suppose by the time I figure out what I want to make I'll change my mind, I still have a really soft sport for the regency period, and can feel another dress from the era coming on.  lol