Showing posts with label Sewing. Show all posts

Friday, 1 February 2013

The Log Cabin Man Quilt part II


IMG_3733 (2)

log-cabin-outline1


So here is a finished block, it’s a pretty easy block to put together.  To the right is a simple picture of the block. 

So with this one little block we can make many different larger blocks.


 eq-star-quilt-pattern So in my search for layouts I found this one above in a large star pattern.

IMG_3734 (2)

I also started playing with some of my squares, this one I did a chevron pattern.

IMG_3736 (2)

Diagonal stripe.

IMG_3737 (2)

And Boxes, I like this one and a simple layout.

IMG_3738 (2) IMG_3737 (2).1

for my quilt I’m doing a large box of sorts. In the center you start with a small box and make concentric boxes outwards. I’ve put a couple of pictures(above) so you can sort of see what i mean.  For the next post I’ll show how I’ve been working the quilt top together.

Thursday, 31 January 2013

The Man Quilt Update

Well I'm a bad llama, I've been working on my next post for the Man Quilt when i discovered some measurement issues and some missing blocks.  SO ... I went looking for the fabric I had set aside from when i was originally making the blocks, only to find that I have no idea where they where put during the the last round of  'Spring cleaning'.  So off I went to the local thrift shop to restock.  I was in luck, home I came with a dozen or so new shirts and set to work making the required blocks.  So now I have 12 blocks give or take sitting on my sewing machine.  I got a little distracted reading .. I had decided to find out what all the fuse was about the Fifty Shades of Grey trilogy, made it through the first book in 2 days.  Not my typical book of choice when it comes to reading but I enjoyed it and went and got the second one from the library the same day... and again had it done in 2 more days, and my poor quilt pieces sit lonely on my desk waiting for more attention.  Okay so now on my fifth day of distraction and I'm trying to get my hands on the last book of the set ... and would you believe it all the copies are out!!  With the book on reserve I set back to work on my blocks once again only to be interrupted yet again. This time it's my back .. can you believe it ...I've thrown my back out and haven't been able to sit at the sewing machine for two days so far and I have no book to keep me busy AARRGG!! I did download the preview to my e-reader ( one chapter is what i got) So now I lay in bed on an itty bitty laptop typing this brief message for my few readers.  Hopeful that maybe tomorrow I can manage sitting at my desk for a bit.

Wednesday, 23 January 2013

The Log Cabin Man Quilt part 1


This has been an ongoing project due to its size.  When finished it should be about queen size,  aprox 90 X 108 inches for.  Each block is about 7.5 in. finished and there is a lot of blocks.  The whole quilt is made out of old dress shirts.  As with all my up-cycle project I cut them apart so they’re easer to work with.
IMG_3732


So I started with some sketches, this is the one I’m using for  laying out the finished pieces so it is not to fancy, just coloured pens and some highlighters.  The pattern drawings have gone miss at the moment.  So log cabin I thought would be a good block the use.. a nice manly square right? Any who…  I set to work collecting what I’d hoped would be enough shirts to make the entire quilt top. I used about 15 shirts or so and a 1/2 meter piece of red cotton for the centers (could not find and red shirts for the life of me at the time.)


 IMG_1893


Next I cut out a crap load of 2in. squares out of the red for the centers (there is about 100 finished squares) and I did a few pieces at a time for the strips of each colour and threw them into a bucket I keep beside my desk, the strips are 1 1/4 inches wide, and I left them in long strips instead of trimming them to size.  When the bucket was full I would sew some squares.

 IMG_1881 
 IMG_1886
I left the 1 1/4 in. strips long so I could run them through the machine one after the other in a long chain, and when on ran out I would grab another out of the bucket at random and continue on.  Making sure to grab the right colour 2 blue then 2 white ect…


IMG_1880


So I did this many many more times. After each row you have to cut apart the chains, I used my handy dandy quilting ruler to make sure I was square as I went.  and pressing the seams before attaching the next row. I did 3 rows of each blue and white


IMG_1885

Here are a few of the finished blocks all trimmed up and ready to go.  In part 2 I’ll show you some of my layout ideas.

Until next time!

Monday, 21 January 2013

Little mans boxer briefs


 IMG_3730   My little man asked for some more boxers the other day, so i asked if he would like me to make him some boxer briefs.  So he ran to find a donor pair from his drawer that where getting a little small.  so we set to work  carefully cutting them apart along the seam lines.  So I found the easiest way to trace around the fabric “pattern pieces” is to put down a piece of cardboard, large enough to for your largest pattern pieces.  On top of the cardboard I put down a piece of paper (i use Kraft paper, used for wrapping packages and come in a roll like wrapping paper) and carefully pin the pieces out flat and trace around them with a pencil.  Now I use my snazzy rulers and make clean lines, because we want them a little bigger I add an extra 1/4 inch or so around all the edges.


IMG_3731


For the front of the crotch I made the lies less curvy and we opted not to add the “pee pocket” (the hole between the layers in the front … you know what it’s for … we just call it the pee pocket) So it’s just a single layer of fabric, which simplifies things a bit. For this project we are upcycle some old t-shirt we have kicking around that are in good shape. 


IMG_3721


So with our new paper pattern we cut out 2 leg pieces,  1 bum, and 1 crotch piece.  Now because of the nature of the area, you want to keep the seems as flat as possible, so instead of the standard seam I placed them one on top of the other an used a surger type stitch or any other fancy or plane stitch.  First  I stitched the crotch to the bum, and each of the leg seams. 


IMG_3722


Next I put the legs onto the center pieces, again using the serger stitch on my machine making a flat seam.


IMG_3724


Here’s what they look like with both legs attached


IMG_3726


Next they needed a waistband, for this pair we use a pieces of non-roll elastic.  I stitched the ends together to make a loop and then pinned it to the top of the undies, making sure to stretch it out as you feed it through the machine.  I used an elastic stitch that is on my machine but a plain zig zag work just as well.


 IMG_3727 

IMG_3720

So here’s the two pairs I’ve made so far.  the only thing left is to finish the leg openings.  The red pair has just a plain piece of 1 inch elastic.

IMG_3728


For fun I use some of the finished edges from the bottom of one of the t-shirts, again trying to keep the seams flat. don’t forget to stitch the ends together


IMG_3729


And voila little boxer briefs!


Sunday, 20 January 2013

Little Suitcase


I found this little suitcase picture on Pintrest there was no instruction an where I could find so I sort of made it up as I went along.

255579347574744829_1iEr9i22_c

So here is a piece of the picture I found. The original is quite long but you get the idea.


IMG_3693

Materials used; I used a pillowcase, a old scrub shirt, a pair of old jeans, and a two longish coat zippers I had kicking around.  For my trial run I decided not to use any interfacing or batting between the layers, to save my poor sewing machine some work (denim is quite thick and I find that the standard home sewing machines do not like to many layers of it at one time,   find three is about the max before I start to have problems).
 

IMG_3695

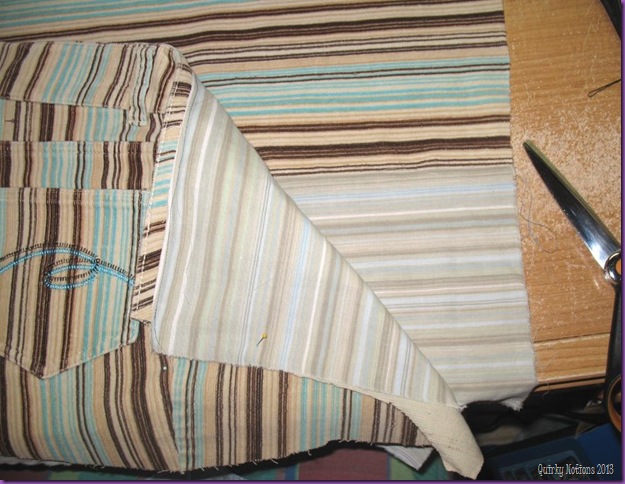
So First things first, because I’m using finished garments/linins I have to cut open the finished seams so I can lay the pieces flat.  For this bag I’ve cut down the front seam from the zipper and all the way around that seam to the back, so that the piece I’m left with is one of the back pockets and one off the front pockets (can be seen better in the next picture).  To reduce a little bulk at the waistband of the pants I cut it open leaving enough fabric to attach a lining fabric to (aka the pillowcase). For the back piece of the bag front (the pocket piece forms a large front pocket on the bag front) I cut a piece of the pant leg the same length as the pocket piece, and again to reduce some of the bulk used the pillowcase to line the unseen part at the bottom( this will ultimately be the inside of the large front pocket).


IMG_3696

Next I pinned the pocket front to the back piece,  trimmed the edges, added the piece for the inside lining (I used the scrub shirt for this) and basted all the pieces  together.  I also cut the back bag and back lining pieces and basted them together. 

This is also a good time to make sure any pockets you want on the inside are sewn in before you baste the pieces together.  And what kind of of handles or  strap you want to attach.  I used so 1 1/2 inch wide twill tape from my stash. 


 IMG_3698

Using the the pant legs for the zipper band I made one long rectangle (long enough to fit around the bag) and the matching lining piece.  With both fabric and lining  cut the band to accommodate the zippers.

IMG_3699

Because I used two coat zippers I put the tops together at the center top and stitched them in.
 

IMG_3700

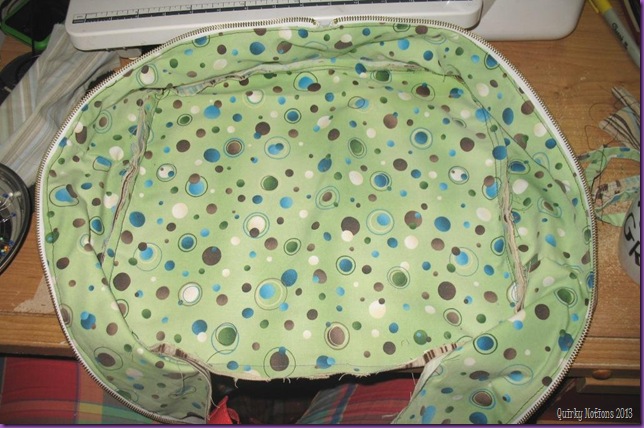
Next I joined the zipper band to the bag front and back starting from the center top and working my way down each side. this is the time you would add piping to the out side of the bag if you like, you also could sew you seems to the out side and bind them the same way I did it look pretty good too, I did my seem to the inside and no piping.  I made my Bias tape out of some of the pillowcase so it would match, but you could use store bought if you like.  Notice I've left most of the bottom open and free, I'll show you why in a later step.


IMG_3703

So here you can see the pockets on the inside front and the stitching for my handles, I’ve also started to pin my bias tape around the seems for a nice clean finish inside the bag.  This time I started from the bag bottom and worked my way all around the seem of the bag.  do the same to both sides. 


IMG_3705

Next I attached the bag bottom to cover the zipper ends from the out side, for this I used a small rectangle of fabric from one one the pant legs. I’m surer there a better way to do this but all in al this worked ok.  I sewed this piece on by machine, just remember not to  sew over the zipper with your machine if you’ve used a large metal zipper like I have.


IMG_3707

For the inside bottom I used a piece of the pillowcase to match the bias tape, this piece I stitched in by hand
IMG_3708

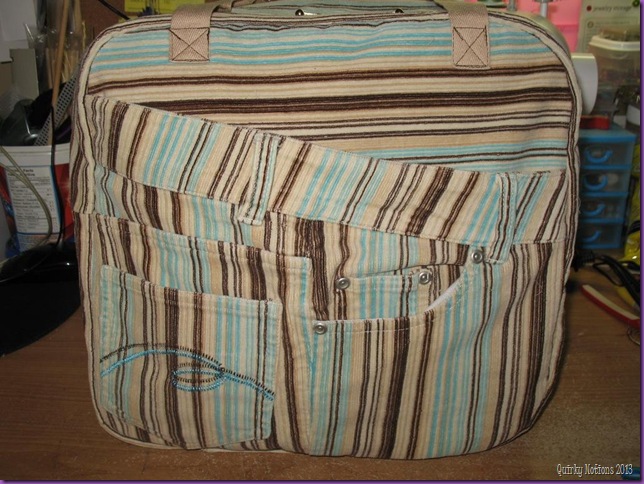
And here she is the finished bag, I think it’s super cute!

Friday, 27 July 2012

I Finally got to wear it!


IMG_3439

I thought I would do a quick post for my regency bib front dress. The Family and I went to Fort York, in Toronto, back in June for the War of 1812 celebrations.  I took my recently finished dress with me so I could get some pics of me wearing it in a setting of the same time period. Although the pics aren't so great I had a good time at the fort with the kids.


IMG_3438
Me looking not so impress outside the officers mess.  While I was actually wearing my dress I found a few things that need shall we say adjusted... I need to make a tuck in the bodice so the shoulder will stop sliding down.

IMG_3419
some of the volunteers that were roaming around
IMG_3428
the Encampment, they had 200 tents set up that weekend
IMG_3471
The York Regency Dancers, they are based at Fort York. 
They were a  lovely group off people we had dance lesions while we were there.

IMG_3442
And a picture from one of my budding photographers!

Thursday, 7 June 2012

Regency Bib Front Dress part VI


It’s  done! after many days of staring at it Finally picked it up and finished it.

I finally machine stitched the sleeves in, stitched the bodice to the skirt, and hand stitched in the lining around the arm holes and

along the skirt.

IMG_3264IMG_3328


I finished hand sewing the side openings, and the button holes for the front , added all my buttons

IMG_3260IMG_3329IMG_3330

I finished stitching down the Bib and added the ties as well.

IMG_3332 IMG_3339 IMG_3340

And the finished dress :)

IMG_3333

And from the back …

IMG_3338