Showing posts with label Crafts. Show all posts

Sunday, 20 January 2013

Little Suitcase


I found this little suitcase picture on Pintrest there was no instruction an where I could find so I sort of made it up as I went along.

255579347574744829_1iEr9i22_c

So here is a piece of the picture I found. The original is quite long but you get the idea.


IMG_3693

Materials used; I used a pillowcase, a old scrub shirt, a pair of old jeans, and a two longish coat zippers I had kicking around.  For my trial run I decided not to use any interfacing or batting between the layers, to save my poor sewing machine some work (denim is quite thick and I find that the standard home sewing machines do not like to many layers of it at one time,   find three is about the max before I start to have problems).


IMG_3695

So First things first, because I’m using finished garments/linins I have to cut open the finished seams so I can lay the pieces flat.  For this bag I’ve cut down the front seam from the zipper and all the way around that seam to the back, so that the piece I’m left with is one of the back pockets and one off the front pockets (can be seen better in the next picture).  To reduce a little bulk at the waistband of the pants I cut it open leaving enough fabric to attach a lining fabric to (aka the pillowcase). For the back piece of the bag front (the pocket piece forms a large front pocket on the bag front) I cut a piece of the pant leg the same length as the pocket piece, and again to reduce some of the bulk used the pillowcase to line the unseen part at the bottom( this will ultimately be the inside of the large front pocket).


IMG_3696

Next I pinned the pocket front to the back piece,  trimmed the edges, added the piece for the inside lining (I used the scrub shirt for this) and basted all the pieces  together.  I also cut the back bag and back lining pieces and basted them together. 

This is also a good time to make sure any pockets you want on the inside are sewn in before you baste the pieces together.  And what kind of of handles or  strap you want to attach.  I used so 1 1/2 inch wide twill tape from my stash. 


 IMG_3698

Using the the pant legs for the zipper band I made one long rectangle (long enough to fit around the bag) and the matching lining piece.  With both fabric and lining  cut the band to accommodate the zippers.

IMG_3699

Because I used two coat zippers I put the tops together at the center top and stitched them in.


IMG_3700

Next I joined the zipper band to the bag front and back starting from the center top and working my way down each side. this is the time you would add piping to the out side of the bag if you like, you also could sew you seems to the out side and bind them the same way I did it look pretty good too, I did my seem to the inside and no piping.  I made my Bias tape out of some of the pillowcase so it would match, but you could use store bought if you like.  Notice I've left most of the bottom open and free, I'll show you why in a later step.


IMG_3703

So here you can see the pockets on the inside front and the stitching for my handles, I’ve also started to pin my bias tape around the seems for a nice clean finish inside the bag.  This time I started from the bag bottom and worked my way all around the seem of the bag.  do the same to both sides. 


IMG_3705

Next I attached the bag bottom to cover the zipper ends from the out side, for this I used a small rectangle of fabric from one one the pant legs. I’m surer there a better way to do this but all in al this worked ok.  I sewed this piece on by machine, just remember not to  sew over the zipper with your machine if you’ve used a large metal zipper like I have.


IMG_3707

For the inside bottom I used a piece of the pillowcase to match the bias tape, this piece I stitched in by hand

IMG_3708

And here she is the finished bag, I think it’s super cute!

Wednesday, 30 May 2012

DIY Explorers Play Tent


IMG_3320  IMG_3266
After seeing the play ten tutorials on on Pintrest I thought I would give one a try for my little man, and it give my hubby some thing to channel his energy into.  So we went out to the hardware store for some supplies.  What we came home with was 2 – 1x2’s that were 8 ft long and a 5/8 inch dowel.  When we got home we raided the linen closet, yet again and pulled out this twin sized sheet set.  It kinda reminds me of the turn of the century explorers (i.e.. Indiana Jones) or an African safari.


IMG_3287
IMG_3270
So now with our materials in hand we headed out for the back yard.  We started  by cutting our 1x2’s in half, so they are roughly 4 ft long, and drilled a hole in one end of each of them.  We used a 5/8 inch drill bit because we wanted to have a sung fit so the dowel didn't fall out of the holes well the kids are playing with it, and we didn’t want to use any glue/hardware because we still wanted to be able to fold it up or take it apart for storage purposes.

Here’s a picture of just the frame, really Simple and supper quick for this part.
IMG_3273

And here is a picture of the the sheet over the frame.  This is where all tutorials I saw online stopped, but we decided to add “doors” (flaps that open and close) to the front and back. We also added a tube at the top to run the dowel through, so it wasn’t sliding all over the place. All you do to make the tube is fold the sheet in half and run a line of stitching down the center along the fold, keeping in mind that the tube your making needs to be big enough to run the dowel through.  On mine I sitched about an inch from the fold.
 IMG_3279

As you can see we used the flat sheet for the main tent portion and I used the fitted sheet for the ends.  We started by removing the elastic from the ends and cutting the seams out of the corners.  Then we folded the sheet in half and cut down the center to make two end panels, then we folded each end panel in half and cut to make the opening for the flaps.  Then we finished the ends that would become the opening of the door (fold over twice and stitch), and hemmed up what would become the bottom of the door panels.  For the the closures on the doors we used  Velcro on one side and on the other we used twill tape for ties.
We also add some ties to the side to help support the weight of the sheet on the frame and so we could tie the doors open.

IMG_3318
The tent has been a big hit, my kids and all the neighbor kids have been play in it nonstop.  If you make one and add the doors like I did make sure your elastic loops are on the out side of the tent, I have to go back and move mine, but other then that it works great! and cost less then $15.

Tuesday, 29 May 2012

Pimp my ... Cart ??

   
Well I’m feeling a little crafty again, and with the Wing Ding (community garage sale) coming up I thought it was time to spruce up my shopping cart.  The big problem I’ve always had with these carts is that the holes are so big you lose you bag through them, and well lets face it how snazzy is a cardboard box in the bottom (if you can find  one to fit).  So here is the game plan … I ‘m going to use some old jeans to make a liner.
So first things first … take measurements.  My cart is about 20 inches tall, 12 inches deep, and 16 inches wide.  I drew a little diagram with my measurements on it so I would remember what number went where.
IMG_3246
IMG_3250


figure out how much fabric we are going to need (how many pant legs).  I used one smaller pant leg for the bottom, and dug up some lager pant legs for the sides.  I gave my self a 1/2 inch for my seam allowance (center picture).  And the picture on the end is Eddie trying to “help”, look at that face  :) .
 IMG_3254 IMG_3252
IMG_3258 
I decided to use some bias tape to finish the raw edges and for a little pop of colour, and some twill tape to use as ties to hold it up in the cart.  I did the bias tape on the sides first and then did the top and bottom to keep it neat.  And here is Eddie “helping” again. 
IMG_3257IMG_3281IMG_3286 

Here’s the test run to make sure it fit and that the ties were in the right places, so far I’m happy with how it’s looking.
IMG_3295

I made a top flap to hide every thing inside the cart, and decided  not to add any pockets for now, although I may change my mind but for now I’m going to leave it the way it is. I added a tie to the center of the flap so I can tie it down if I want/need too.
Here’s the picture before the flap was attached and all the bias tape done.
IMG_3302

and  After, the finished bag, ain’t she purdy.
IMG_3306

Tuesday, 15 May 2012

The Faux Feather Pillow


IMG_3210Well  I wanted to make some throw pillows but I have no “fluff” to stuff them with, so the creative wheels turn. I have a bag of snippets that was getting quite full, it’s been hanging next to my sewing machine for about a month now.  Usually I would throw it out when the bag was full, but this time I thought I would use it to stuff my pillows.  Will surfing the net I came across a tutorial for how to make stuffing from Belrossa’s Blog. Now having reed through the post to find she ran her bit through the blender.  /Now I was forbid running any thing that is not food through my blender, I just cut my bits into really small little bits (some thing the little people could do to, they like to help when it involves taking things apart.)  


IMG_3202
IMG_3203
So here is a picture of my tub o’bits.  Now to contain my bits and pieces I used an old t-shirt as the pillow form.  All I did was cut a square (mine was about 14in. sq.) and sew three sides together.  After the case was about 2/3 full I sewed up the last side to keep all the '”fluff” in.


Now for the pillow cover, I used some bits and pieces from some button up shirts that where kicking around.  I used two short sleeves from one shirt as the back, I overlapped the finished edges so I would have a place to slide the pillow into the cover.  Then I pieced together some other pieces to make the front.
 IMG_3205 IMG_3207 IMG_3204
IMG_3209
IMG_3211
The next thing I did was to put my Backing piece over the front pieces with right sides together, and stitched all the way around. I then trimmed all the excess of the edges and prettied it up and turned it right side out.  Now your ready to slide you pillow form into its cover and voila a Faux feather pillow.  I find that the squish of the snippet fluff mimics a feather pillow with out the pointy hard feather bits poking you in the head.


Monday, 14 May 2012

DIY Ironing Table


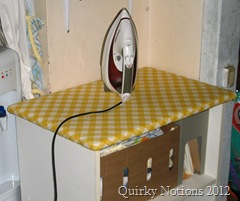
IMG_3193So I’ve been seeing these little ironing tables made from the cheep wood TV trays and was thinking that I would really like to make one to put beside my sewing machine and the more i thought about it the more the gears started to turn … staring at this old stand that was still in good shape. I figured if they can cover a TV tray I could cover my stand.  There is a nice tutorial for the TV tray ironing table here.  The really nice thing about covering the top of this stand is that it’s on castors so I can roll it around the room with out disturbing what’s on it.


IMG_3180

I started with the cheepy microwave stand you’d find at Wal-Mart, or any other department store.  I had a plain white one kicking around from my apartment days  sigh …. Very dusty but I wiped it down before I put the top on.


IMG_3181

I started with an old towel for a little squish to my board, I put a staple in the center of one end with my handy dandy staple gun, pull it taught non the opposite end and droop in another staple. I only put a few in each side for now.


IMG_3184

I then put on two layers of Cotton batting.  I would have used the heat resistant kind if I had any kicking around, but the plain stuff will do.  Again I dropped a few staples in each side keeping the material taught.


IMG_3186

Next is the pretty fabric for the top, I used a medium weight cotton for mine.  So again keeping the fabric taught staple along the sides, leave enough room to fold the corners in.  When you get to the corner you can cut away the extra batting from  the corner and neatly fold the fabric around the corner.  See horrible pic below.

 IMG_3187IMG_3196
Here is a shot of my messy staple job but no one will see it hidden underneath, if I wanted to get fancy I could cover it with some felt but like I said, no one should see it.

Tuesday, 8 May 2012

This Weeks Crafty Diversions

So this week I've been working on my mother in laws birthday/mothers day present, I should be pretty safe posting it here, not like any one is reading my posts lol. So this is how is looks so far, she really likes apples and owls.  I found a little wire fruit bowl and a set of apple dish towels to line the bottom.  I all so added in some of my hand knit wash cloths.


 And I made up some apple coasters based on the pattern found here, but as I mentioned before I'm not known for following directions well and winged it as usual.  I think they look good enough to be dripped on :).  there is a tutorial for them too, you can find it here


I finished another UFO project this week as well.  I like how it turned out, but its a little blah .. I'll have to add some ribbon flowers or some thing to it. I made it from this from the book Making Vintage Bags, I've made a few of the bags from this book.  One of these days I'll buy it, but for now I just keep borrowing it from the library.


I made a set of father and son boxers just for fun, I thought it would be cute.


Watched Pride and Prejudice twice!


I've got just shy of a dozen t-shirt market bags ready to run through the sewing machine destined for the farmers market.

And made this snazzy little number that matches my new curtains.  You can find the tutorial here.  I'm starting to get a bit of a 50's vibe going in my kitchen I'm kinda digging it.  :D


I think thats about it for the little stuff from last week, un till next time!